11 ways to improve your ironplay
Published: Last updated:


11 Great ways to improve your ironplay
Technology presents a clear picture to the club golfer. Arccos stats show how our handicap level is at the mercy of our ability to hit greens; they also reveal an ugly tendency to come up short, and how a lack of clubface control sees us miss both sides. GC Quad impact data reveals the importance of strike point, attack angle and a stable clubface in creating efficient energy transfer from club to ball… and getting that approach back to the pin.
So here, TG’s team of Top 50 coaches join forces to give you 11 great tips and drills, each one designed to sweeten your striking. After all, if you want to improve your GIR stats, you need to improve your contact.
Ironplay: The stats prove where amateurs go wrong
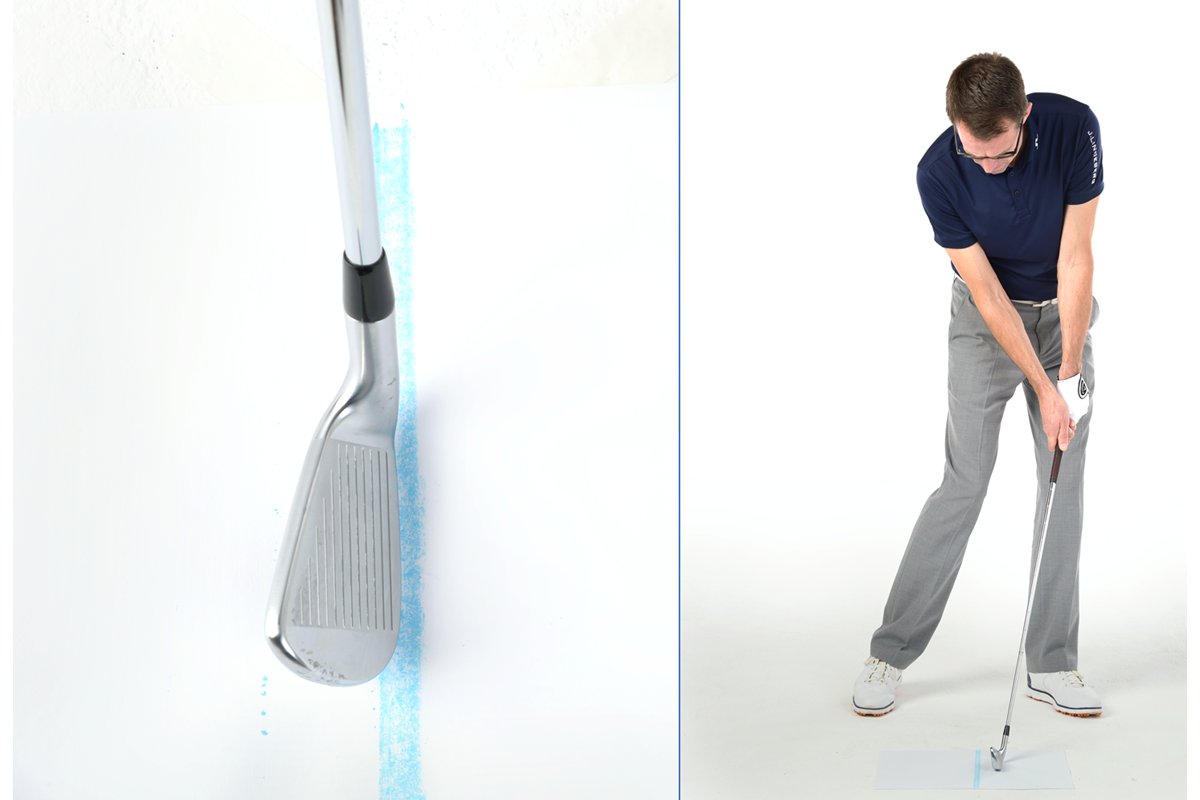
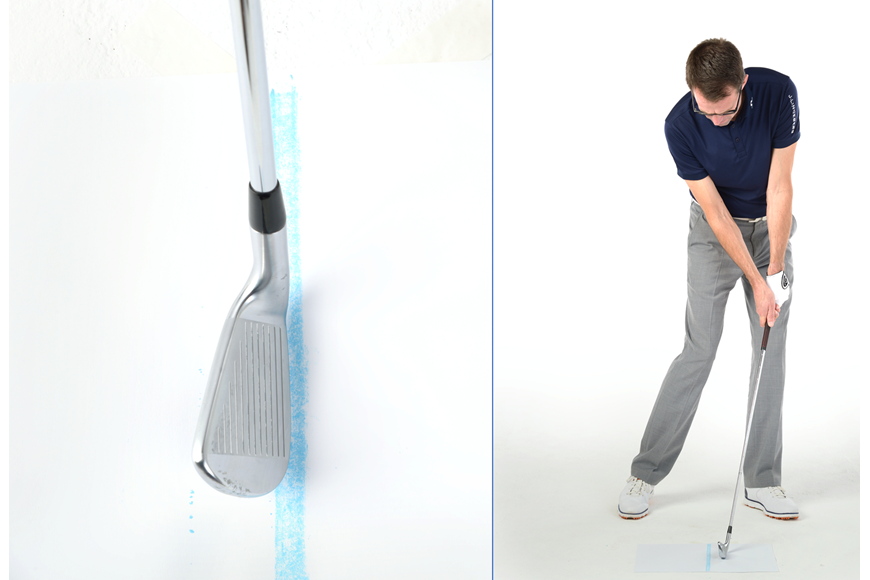
No.1: Hit The far Side
Take a piece of chalk with you to the range. Draw a bold line on the grass at right angles to your ball- target line. Set up so the line represents your ball position for your 7-iron, and with the leading edge of your 7-iron against the line.
Later Ground Contact
From here, and without a ball, simply swing the club with the sole focus of feeling the sole of the club hitting the ground on the hole side of the line. Achieve this and you will nd the weight shift, later release and forward shaft lean that promote that powerful downward strike.

No.2: Create A Post-Impact Swish
Well-timed iron strikes make use of ‘lag’, the club lagging behind the body and arms before snapping through at great speed. To train lag, turn a mid-iron upside down and grip the hosel with your trail hand only. Start swinging it back and through, making as loud a swish with the grip end as possible.
Delayed Peak
After a few swings, train your focus on when the swish is at its loudest; is it pre or post ‘impact’? If it’s before, this suggests an early release and more of a weaker, casting action. Creating the louder swish after impact means a later, more powerful release of lag and an accelerating club through impact.

3. Use a peg to feel the force
Peg Obstruction
Find a long tee peg and stick it deep into the ground. Leave just the thicker top part above the turf. Take your 7-iron and set up to the tee. Place the leading edge against it.
Push against the tee
The key to this drill is to apply pressure against the tee through the club. Providing the turf is rm, the peg provides enough resistance for you to build up quite a lot of force. You will quickly feel that to push the club harder against the tee, you need to push off through your back foot.

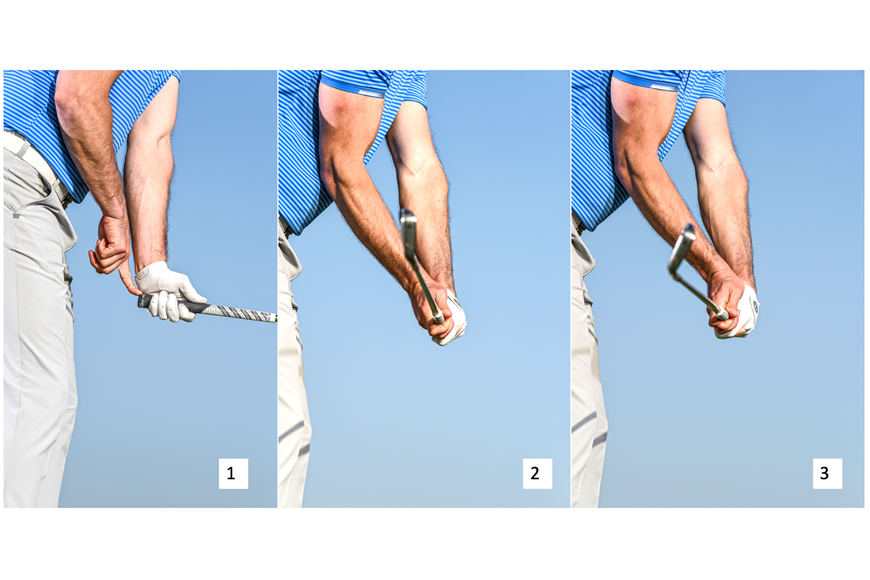
No.4: Stabilise The Face
A stable face creates a more controlled strike. One clear way elite golfers stabilise the clubhead through impact is by making sure they do not have to manipulate it through the ball. When the club is effectively in its ideal impact position early – face square, lead wrist slightly bowed – you can create a much more consistent and controllable delivery. Use this three-step plan to feel a first-class delivery position.
Cock the lead wrist
Grip the club in your gloved hand only. Now cock the wrist upwards, against the thumb, until you form a right-angle between the lead forearm and the clubshaft. This creates a powerful hitting angle that can be released at impact.
Rotate Forearms
With the lead wrist cocked, add your lower hand. Now rotate your lead forearm until the club points directly away from target. This puts the club onto a good path. As you do this, keep the shaft horizontal and don’t let the hands move further from your body.
Bow The Lead Wrist
Now hinge the lead wrist joint backwards so it begins to bow. As you do this, feel how the clubface starts to point downwards; at a similar angle to your spine, it is square. Practise and you’ll develop a calmer release and more consistently square clubface.

No.5: Train A Later Release
One of the symptoms of a poor iron attack angle is what is termed ‘casting’ – in other words, throwing away that powerful angle between your lead arm and clubshaft before impact. Retaining that angle means a later, more powerful strike on a more effective, downward angle. Here’s a drill to help.
Early Release
Cheaply available, a plastic dog ball thrower makes an excellent late-hit trainer. Grip it like a golf club, the ball facing forward, and swing. If you cast the club or release too early, the ball releases out of the clasp and hits the ground before the impact zone
Stronger Angles
Try that move again, this time holding on to your wrist angles for as long as possible. Note how, when you do this, the ball stays in the clasp… only releasing free and hitting the ground on the hole-side of your would- be ball position. Practise this move to train a later release and a more dynamic, downward attack angle.

No.6: Picture No Loft
The Tour pro averages a 4-5 degree downward blow, an angle that delivers consistently strong energy transfer from club to ball. Picturing no loft is one of three ways you can improve your own attack angle.
To experience how this works place a club on the ground, its shaft pointing down your target line. Address the butt end. Now, simply focus on pushing the clubface into the butt to send the clubhead towards your ‘target’.
As you do this feel how your hands naturally move forward, ahead of the clubhead, to create that force through the shaft. You’ll create some forward lean in the shaft – a key indicator of applying the correct, slightly downward attack angle.

7. Miss the towel
Fold your bag towel and lie it across your target line, as shown. Place a ball three or four inches ahead of the ball. Now all you have to do is miss the towel coming into impact. Missing the towel means powerful lag retention and a squeezing attack angle. Contact with the towel reveals a tendency to cast or flick at the ball.

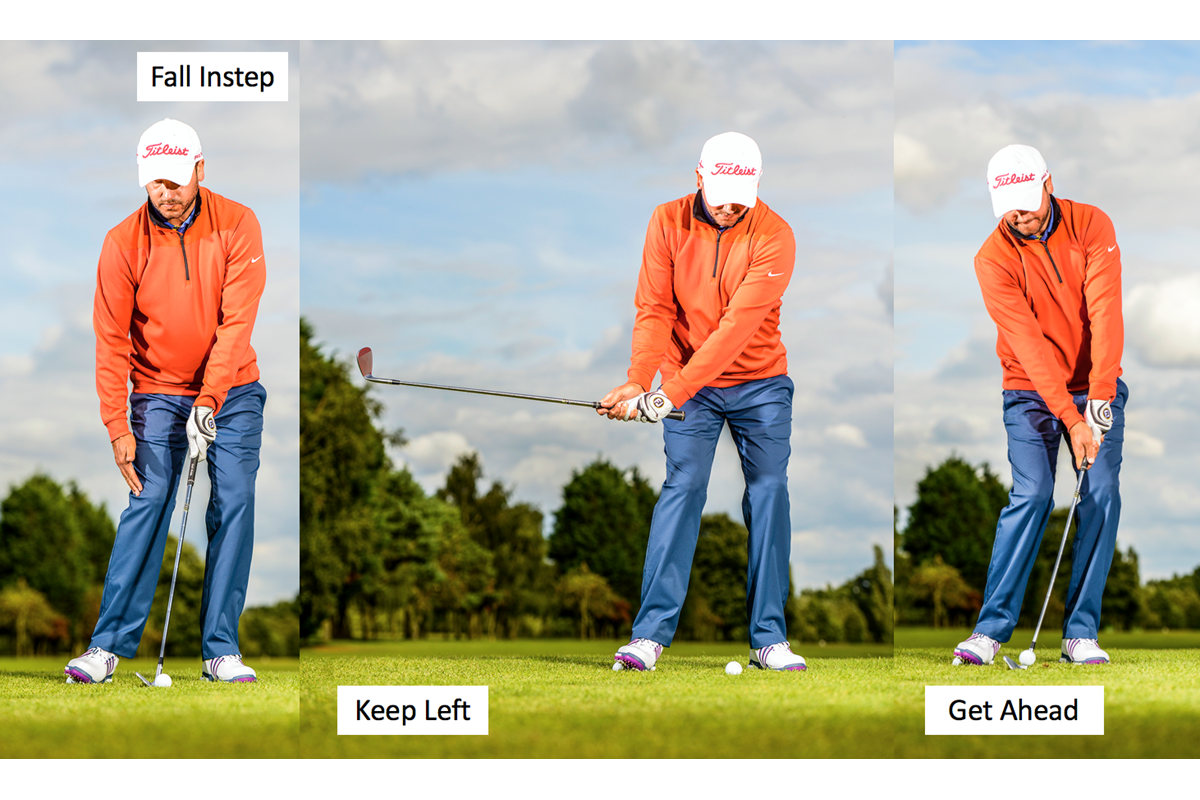
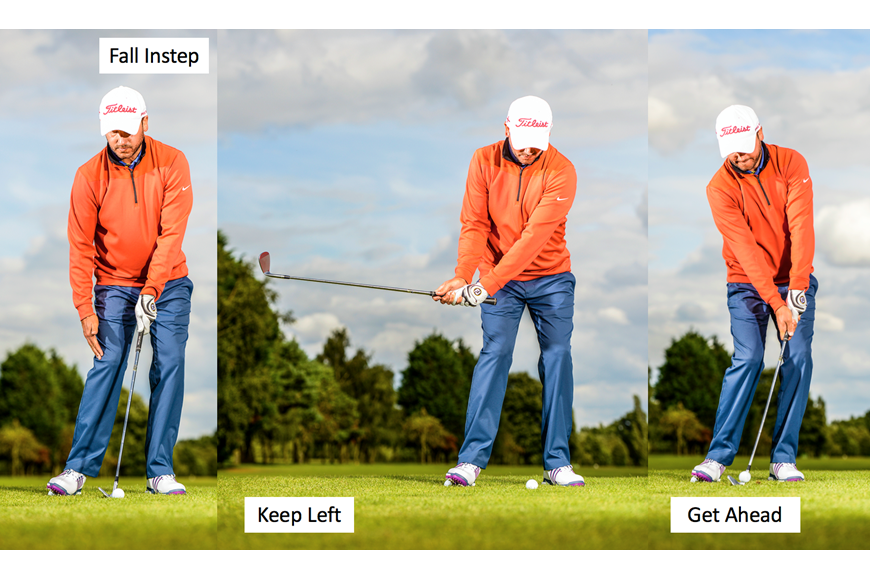
No.8: Avoid Lateral Movement
One of the most common reasons golfers fail to strike down on the ball correctly is an inability to control the low point of the swing. The swing bottoms out broadly opposite the lead shoulder. With a central ball position, this means the low point should fall after impact… hence a downward strike. But if you sway away from the target during the swing, the low point shifts back behind the ball, meaning a weak, upward strike. Here is a drill to help.
Fall Instep
Take your iron stance, but place a ball under the outside of your trail foot. This rolls the foot on to its instep, pitching your weight forwards. At address you should be able to feel a slight kink in the outside of your trail leg. You’ll also feel your lead leg supporting most of your weight.
Keep Left
As the club swings back, your new trail foot position will refuse to bear weight. This kills any tendency to sway back, off the ball. You should feel the same pressure under the lead foot you felt at address.
Get Ahead
This new stance will give your set-up and swing a more lead-sided look, but you should still feel balanced while you hit the ball. You’ve effectively built in a barrier against the sway, something that will lock the swing’s low point in position, ahead of the ball.

No.9: Split your hands to gain face control
Hold the face square
Hit half-shots with an 8-iron; look to hit the ball around 80 yards. Focus on your awareness of the clubface, and feel how the split grip controls the face better. With the hands apart, the club is not so ready to rotate and ip. Assist your new hold by keeping the face looking at the target for longer.
Harness the Handle… and the Head
If your clubface feels much too lively through impact, a great way to calm it down is by hitting shots with your hands spread on the grip. Keep your gloved hand in its regular position and move the trail hand down to the bottom of the grip.
Shaft and face tamed
Hitting shots like this allows you to experience the feeling of a more stable shaft and face, and understand what you need to feel with your regular grip. Work on this half-swing to groove those feelings before returning to your regular hold and trying it with a full swing.

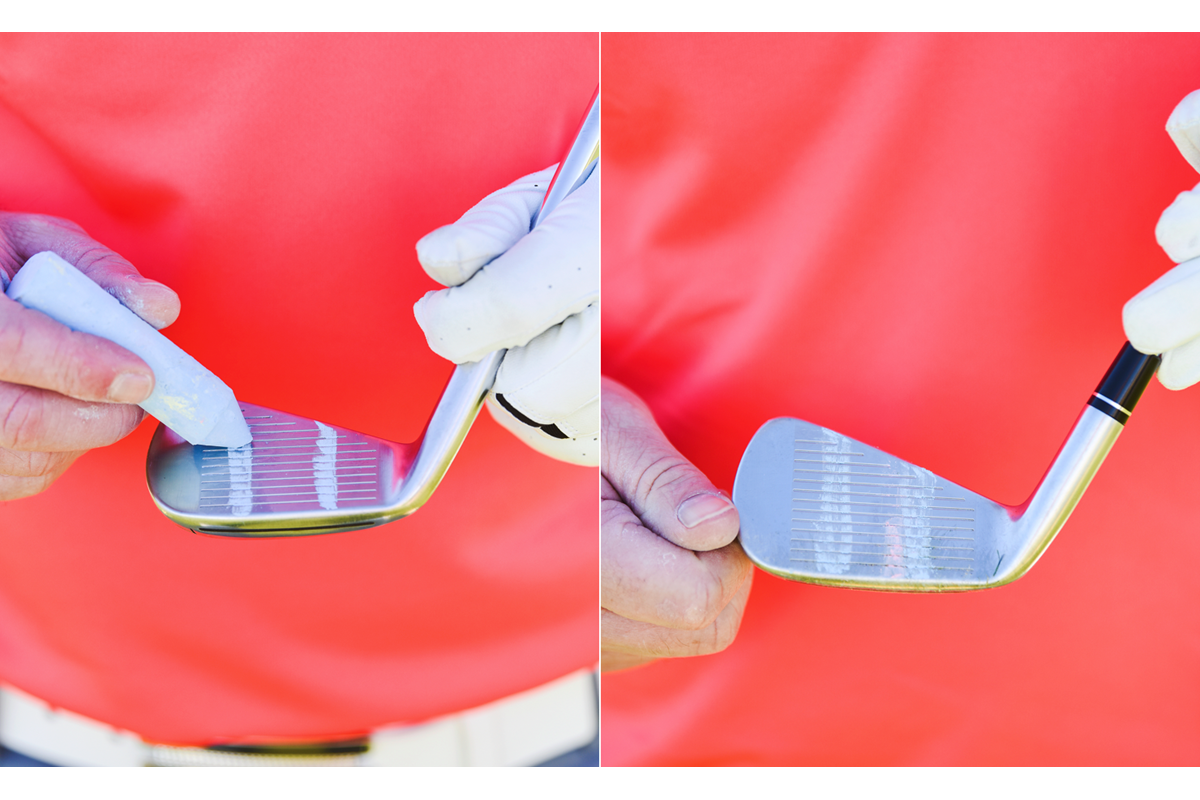
No.10: Sharpen Your Awareness of Strike
Focusing your awareness and attention on the strike can often be enough to improve your ability to hit the sweetspot. All you need to do this is a piece of chalk.
Frame the sweetspot
Use the chalk to draw two vertical lines on the clubface. An inch apart and either side of the centre of the face, these will frame the sweetspot. Make another chalk mark on the ball itself, and ensure the mark is facing the clubface when you position the ball.
Stay face-aware
Take a 6 or 7-iron, and address the ball. Those marks on the clubhead will help train your focus on the face. Forget technical thoughts and hit the shot, focusing on strike quality only. After striking the ball, examine the clubface to see where the chalk on the ball left its mark. Repeat this drill, keeping your attention on strike point and quality; you will find your striking improves.

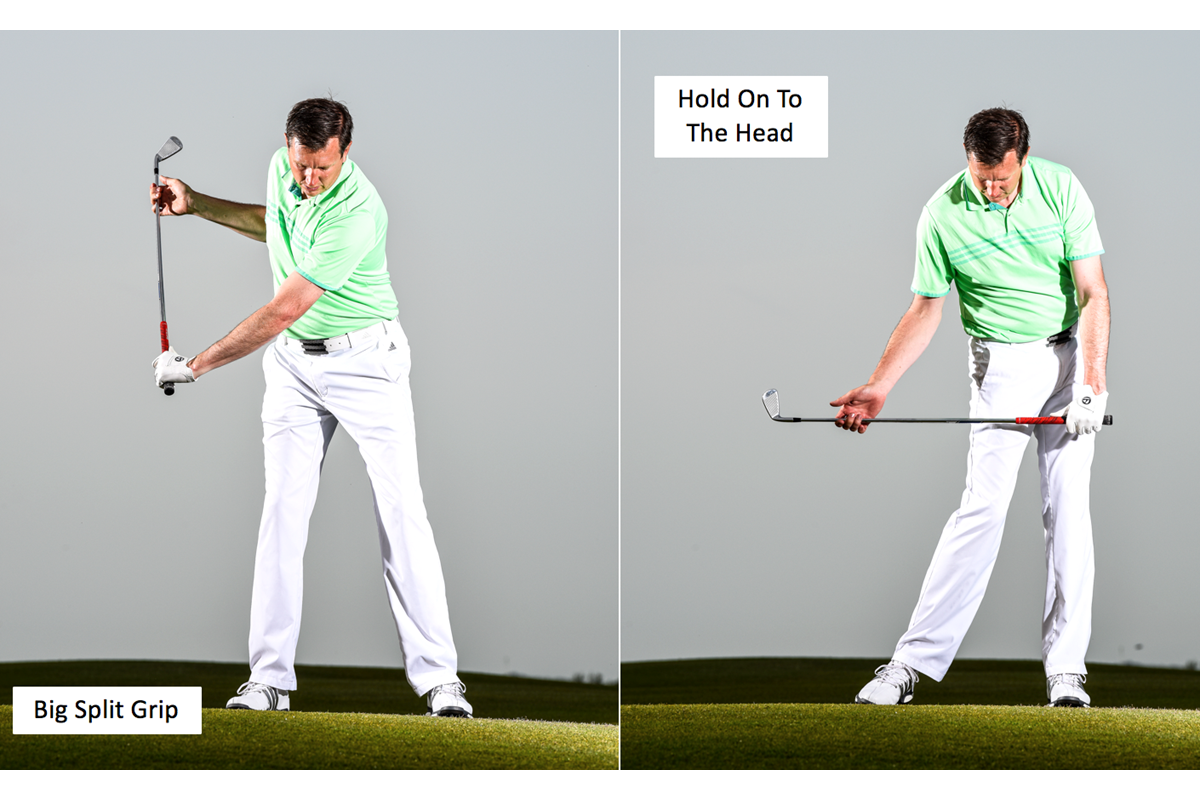
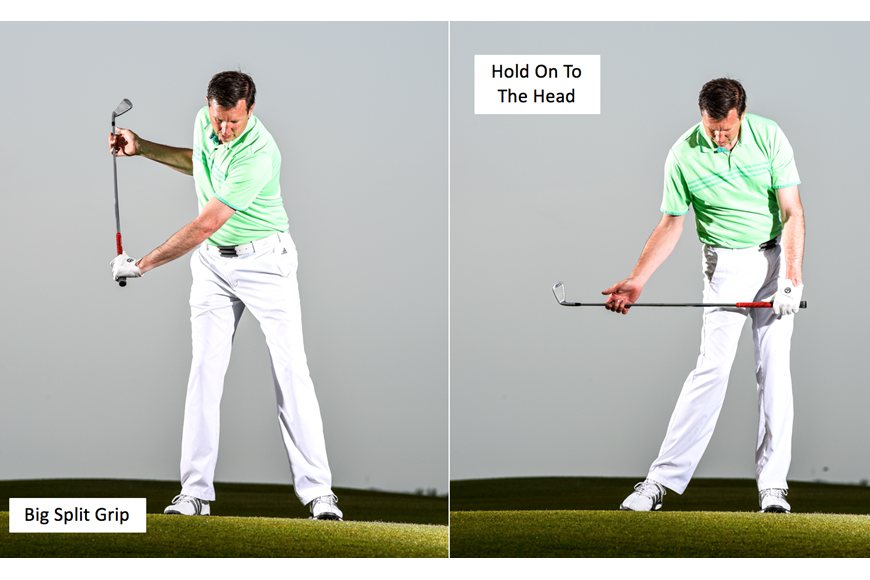
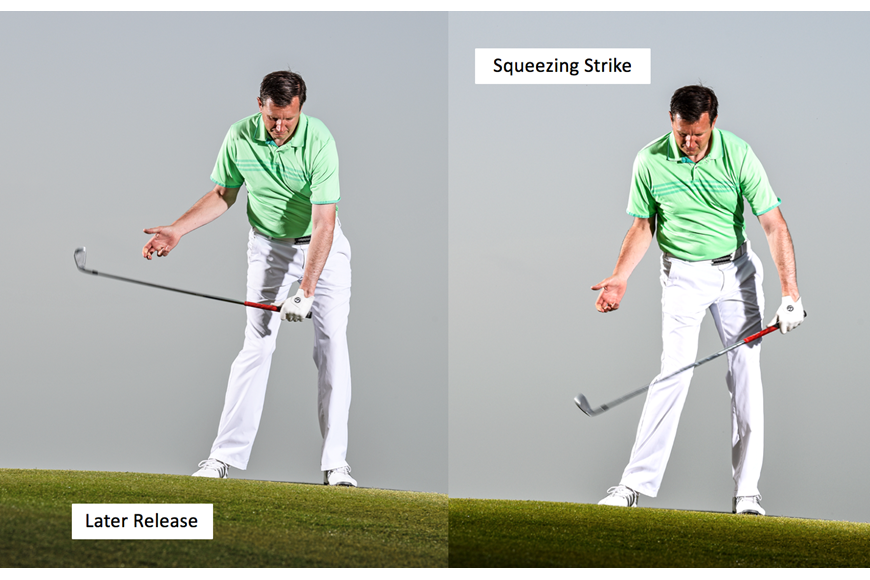
No.11: Improve Timing For A Better Strike
Watch any Tour pro just before impact and you’ll see a strong angle between their lead arm and clubshaft. Sometimes called lag or a late hit, this angle is key if you are to create the crisp, squeezing strike that means clean contact and imparts maximum power and spin. Club golfers often throw this angle away before impact, limiting speed, strike and power. This drill helps create and maintain it.
Big Split Group
Take a short iron and grip it in your gloved hand only. With your trail hand, hold the club up at the other end, on the shaft just above the hosel. Make a half-swing back, until the clubshaft is vertical.
Hold On To The Head
Now swing back towards the ball… but keep holding on to the hosel of the club with your trail hand. Notice how this move creates a strong angle between the lead arm and clubshaft

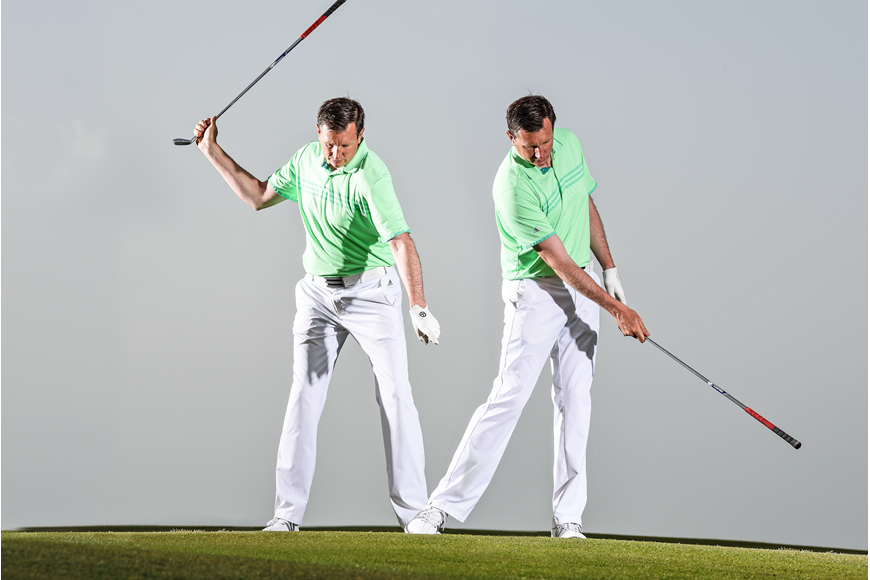
Later Release
Now, as your gloved hand swings past your lead thigh, allow it to pull the club forwards and out of the grip of the trail hand. Let the clubhead fall downwards as you pull the handle forward.
Squeezing Strike
This drill gives you the feeling of the clubhead arriving at the ball later, after the hands have moved through, and the squeezing strike it delivers. Try it five times before hitting a shot for real and trying to repeat the later delivery.