Golf’s Most Costly Shots: Cured
Published: Last updated:


For anyone who’s sliced it OB, three-jabbed from nowhere, duffed a chip or left a bunker shot in their own footprints, this is for you…
It won’t have escaped your notice that not all of golf’s crimes carry equal punishment. We might not enjoy a necky drive that cuts off into the rough, but when you compare it to the big yahoo over the adjacent trees and into the farmer’s spinach, it leaves us in pretty good shape.
RELATED: Me And My Golf’s best-ever tips
Getting on top of golf’s most expensive errors, then, is the fast track to improving your scores. And, thanks to innovative data-capture technology like the wrist- worn GPS-based Shot Scope, we know exactly what these expensive shots are.
Shot Scope has monitored some 15 million shots over 320,000 rounds since it was launched four years ago, and can tell us exactly how costly each type of miscue is. It won’t surprise you to learn that the big driver miss – OB, lost ball, unplayable lie – is among them. So too are three-putting, duffed chips and leaving the ball in sand – all common errors that cost us almost a full shot each time.
Here, we pair Shot Scope’s insight with the expertise of TG Top 50 Coach Oli Morton to both identify and cure golf’s most expensive shots. Target them and your scores will swiftly improve.
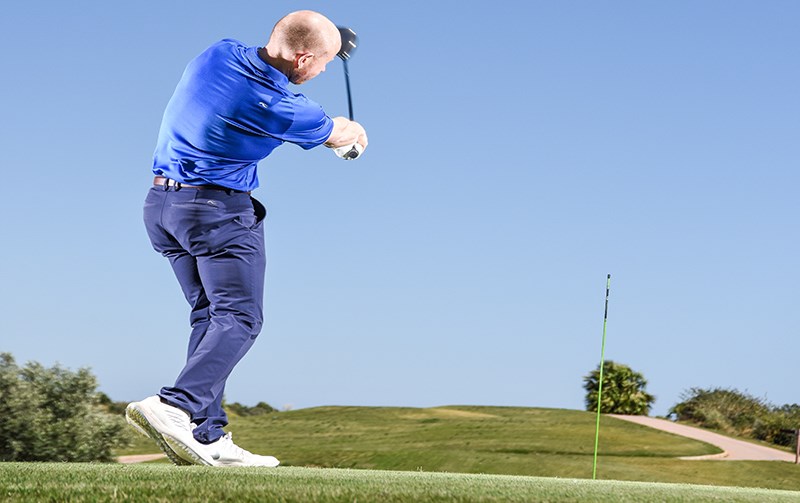
Driving: The Big Miss
Really wayward driving is so costly because it tends to give us our biggest misses – out of bounds, lost balls, unplayable lies. The reason for these seriously offline shots is broadly a mismatch between the clubface angle and the swing path at impact. This is how we end up putting massive shape into our shots, and it becomes more problematic as the clubface gets less lofted. While that sounds quite complex, there’s a simple drill you can do to bring face and path into a more effective relationship.
THE DATA SAYS… We asked Shot Scope’s chief commercial officer, Gavin Dear, to analyse the data around all these costly shots. He told us: “Big-miss driving is the result of a certain combination of driving distance, accuracy and handicap. Consequently, we actually have a specific persona for the golfer who is most at risk from wild tee shots.
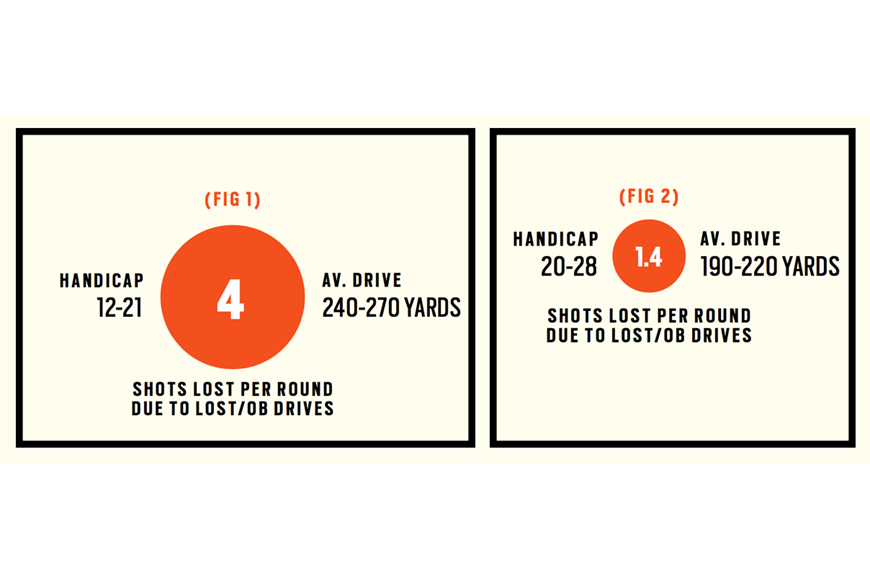
They are a 12 to 21 handicapper, who drives the ball between 240 and 270 yards. This player (Fig 1, below) lacks some control, but has the power to hit the ball into the rough and neighbouring eld. They will lose, on average, four shots per round to lost balls/out of bounds from tees. In comparison, a golfer who plays off 20 to 28, but averages driving distances between 190-220 yards (Fig 2), will only lose 1.4 shots per round because they generally don’t hit it far enough to be really wild and lose balls. “
Clearly, then, it’s the golfer who generates that extra amount of clubhead speed who will gain the most from developing control and taming that big miss. Generally, hitting a wild tee shot out of bounds or into the rough and losing it results in the loss of two shots – the penalty and also the replacement tee shot which – on 96 per cent of occasions – is hit with the same club.”

Mistmatch: Below is a simple and common example of a face/ path mismatch. The club is swinging from out-to-in, or leftward for the right- hander, while the face is open or facing right. It’s a double-whammy blend that promotes a glancing blow and excessive slice spin.
Tame the face then the path: The face and path don’t have to be exactly aligned, but bringing them closer will take the massive shape out of your shots. The drill we are about to learn is a non-technical way of doing that. Working on each in turn, it will help you learn to control the face before blending it with an appropriate swing path.

STEP 1: HARNESS THE START LINE.
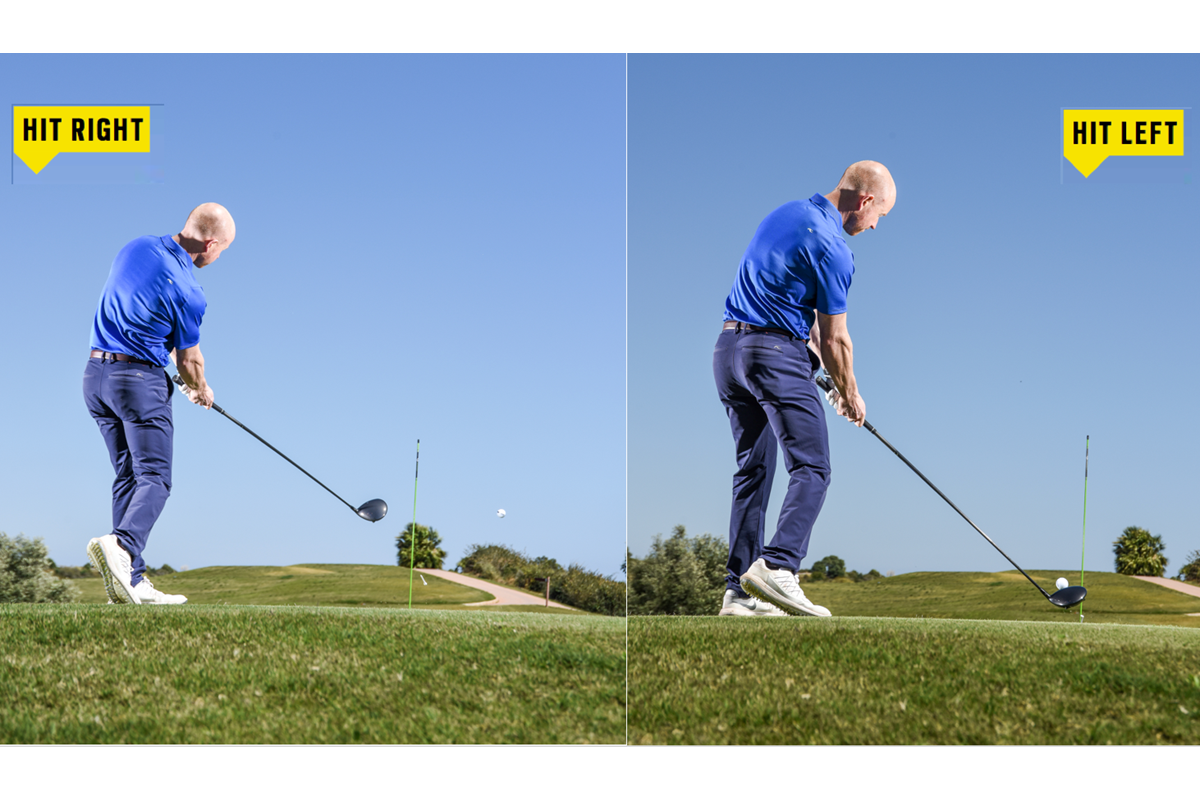
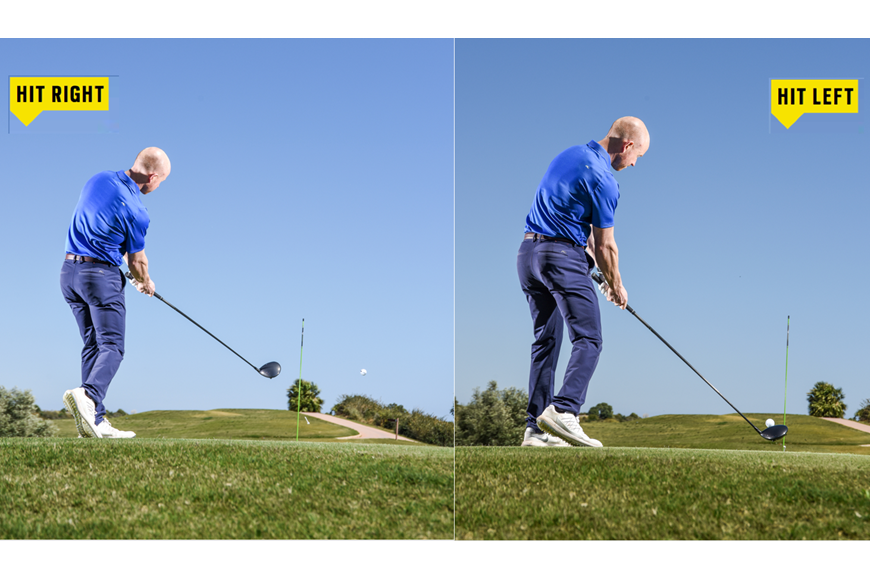
To make headway in taming that big miss, you need to first focus on gaining control of the ball’s start line. Stick a cane or golf club four or five yards in front of the ball on your ball-target line and set up to the ball. Instead of just blasting away, we are going to work on sending the ball either right or left of the cane at will
• Hit Right: At first focus on sending the ball right of the cane. At this stage don’t worry where the shot ends up; we are only working on start line. Launch monitors have shown us that start line is mostly down to the club’s aim at impact, so to control the shot’s initial direction place your attention on the clubface. In a short time you will develop a feel for how to create the open or rightward face aim that sends the ball right. Keep going till you hit five in a row right of the cane
• Hit Left: Now repeat the drill, but this time we are going left of the cane. Again, focus in on the aim of the clubface and work on developing a feel for the leftward aim that lets you hit this start line. Once you’ve done five in a row here mix up rights and lefts, holding the face open or rotating it through impact to hit your chosen line. Slowly but surely you are gaining control of both the clubface, and the ball’s start line.

STEP 2: GAIN SHAPE CONTROL
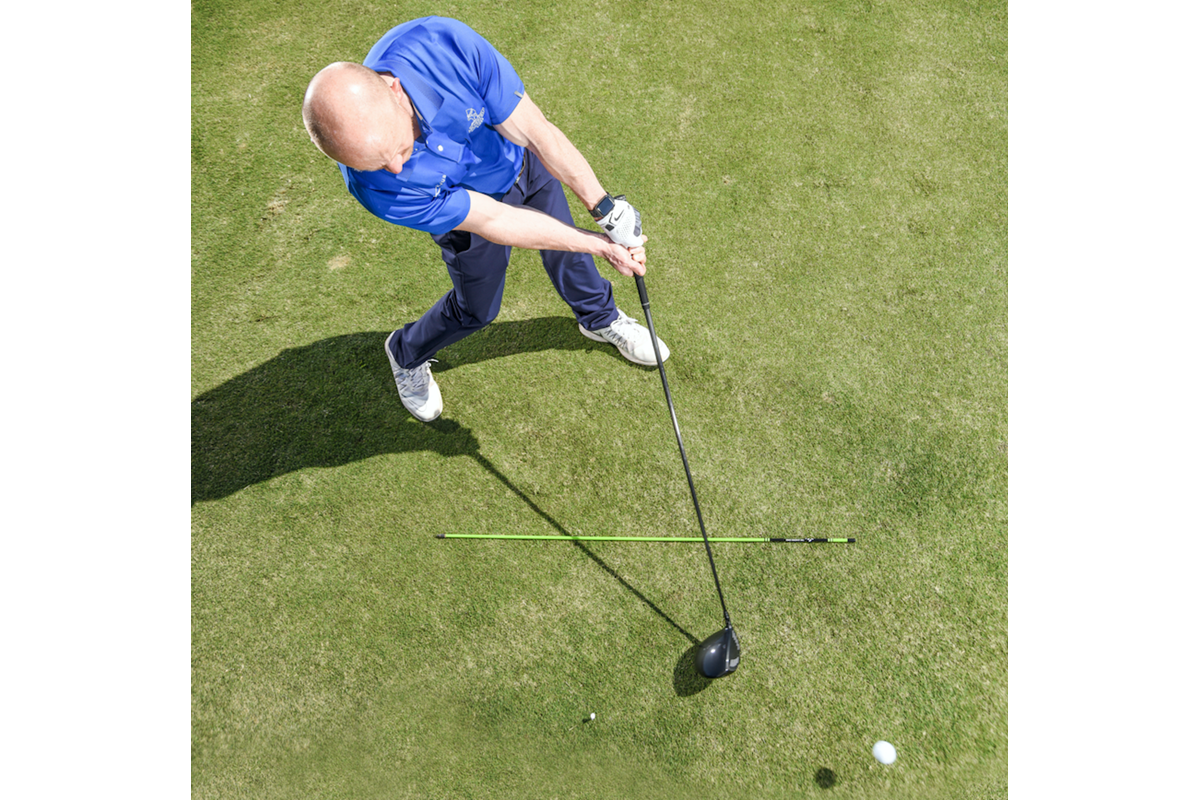
Once you feel adept and confident with face control and start line, turn your focus to what happens to the ball in the second stage of its journey. Whether we are sending it either right or left of the cane/target line, we obviously need the ball to curve back towards it. We do this by controlling swing path, which is influenced by the alignment of your feet, hips and shoulders.
• Creating Right-To-Left: Keep delivering that rightward face aim as developed in step one, but this time experiment with your body aim. You’ll quickly discover that while aiming left of the cane increases slice spin, aiming right of it brings it down.
• Creating Left-To-Right: Now turn to the opposite side of the cane to work on that fading, left-to-right shape (right-handers). Once more, deliver that left-looking face while you experiment with body aim.

• Perfect Blend: Keep hitting shots sending the ball right of the cane, but try some different body aims. When you begin to get your alignment – and the club’s path – further right of the clubface’s impact aim, you’ll begin to turn that slice into a draw.

• Team Work: This time you’ll begin to gain a feel for how aiming left and swinging on a more leftward path curves the ball’s initial left start line back towards your target. Now you have face aim and swing path working as a team, not against each other.

Fluffing Chips
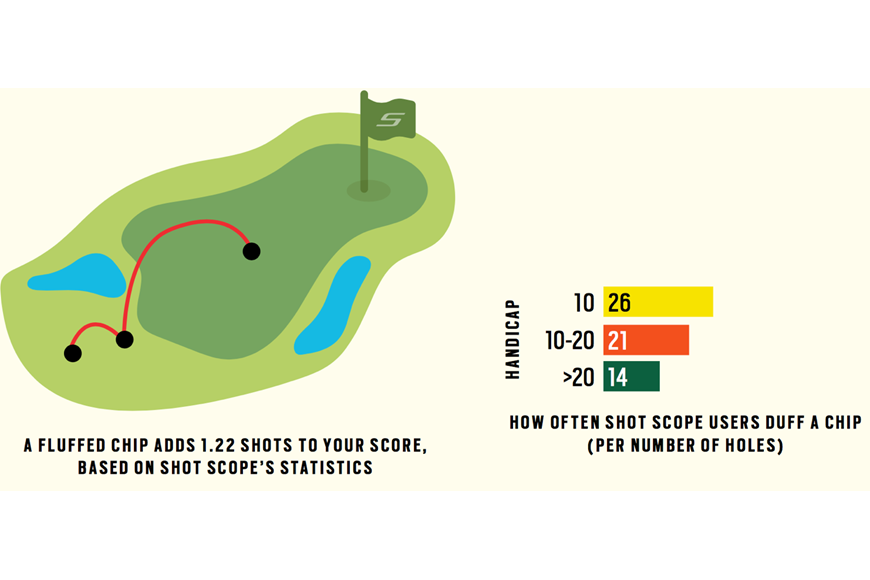
Fluffed chip shots aren’t just humiliating; often the undoing of two impressive blows to the greenside, they can massively dent both your scorecard and your patience. The fact the du ed chip usually only moves the ball a couple of feet or so guarantees one whole extra shot, and makes this a shoe-in as one of golf’s most expensive errors. Here’s how to undo it.
THE DATA SAYS… Duffs, of course, come in various guises. The infamous bounce- thin is a heavy contact which nevertheless typically sends your ball through the green. Then there are other slightly heavy contacts that you see come up well short. Our research centred on the real, pure duff – the shot that sends the ball only two or three yards. While this shot is not so common throughout our database of chip shots, it crops up much more commonly when we only consider golfers who have registered a duff.
Here, for golfers with a handicap above 20 it occurs once every 14 holes; golfers with a handicap between 10 and 20 duff chips every 21 holes. For golfers with a handicap less than 10, it occurs once every 26 holes. “When the duffed chip occurs, it costs just over one shot – 1.22 exactly – as the player is less likely to get up and down from the resulting position of the fluffed effort.

This is probably because, having just mishit the first shot, they don’t want to make the same mistake again, and perhaps hit a lesseffective second chip. Normally, a duffed chip leads to a double bogey.
• #1 -Too Steep: Typically, the heavy chip shot is an attack angle issue. Attack the ball too steeply and the sharp, leading edge of the golf club can so easily bite into the turf, killing the club’s momentum and piling turf between the club and the ball. This is why the ball goes nowhere. The solution, then, is to shallow out the attack

• #2 – Boxing Clever: Find an old three-pack golf ball box. Position it flat on the ground as shown, across your ball- target line, and a foot’s length in front of the ball.

• #3 – Shallower Attack: From here all you have to do is hit chip shots, making sure the clubhead swings through above the box. Make that old, choppy attack and the club will hit the box; to miss it you’ll have to make a shallower pass at the ball – a much more effective attack angle that allows the forgiving, curved sole behind the leading edge to bruise the turf.

The Bounce Trim: On rarer occasions, golfers create expensive chipping misstrikes by being too shallow into the ball. This can lead to the infamous bounce thin, the sole skipping off the turf and causing the leading edge to catch the belly of the ball.

Get Steeper: If this is your issue, you need to steepen your attack. So simply reverse the above drill, positioning the ball box a foot’s length behind the ball. This time, that over-shallow attack catches the box; to miss it you must attack the ball on a more downward angle that stops the club bottoming out behind it.

Leaving It In The Sand
Clearly, the duffed, heavy bunker shot is an example of a miscue costing an entire stroke… and possibly more if that devious little ball rolls back into your sand divot or footprints. Here’s why it happens… and a simple new approach to stopping it.
The Data says
“Stats on this can be misleading, because they relate to how often a golfer goes in a bunker in the first place. Generally, lower handicap players are better at avoiding bunkers compared to higher handicaps, as the data suggests that the following handicap players find the sand, on average, this many times during a round…
“This means that even poor bunker players with an eight handicap will have fewer problems than a 20 handicap poor bunker player, as they are simply not in bunkers as often.
“So to analyse how common this shot is, Shot Scope looked at golfers on our system who have left more than five shots in the bunker. On average, leaving the ball in the sand occurs every 37 holes.
“When a golfer does leave the ball in the sand they are much less likely to then get up and down at the second attempt.
“A ball left in the sand costs the golfer an additional 1.6 shots. “This is probably due to the fact that the ball is either in a poorer position in the bunker, or maybe plugged in the face of the bunker or in the player’s technique.”
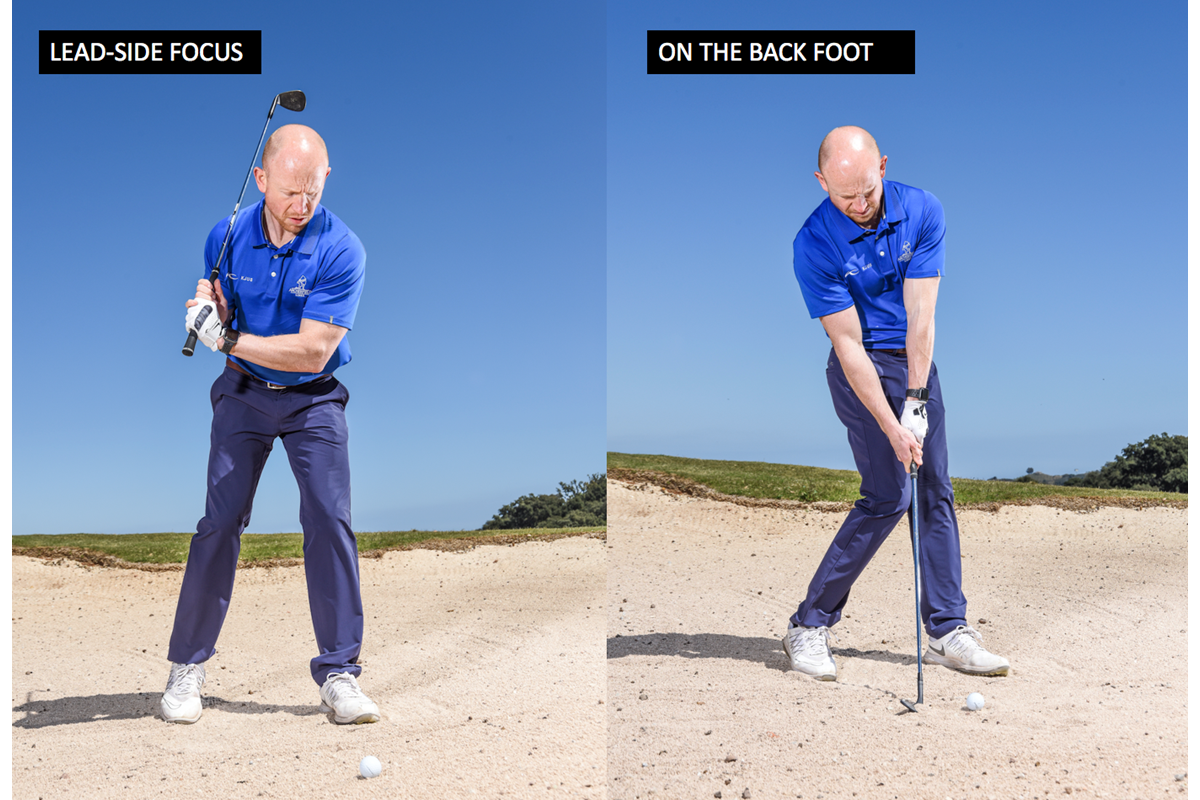
Lead Side Focus
To defeat this nasty duffed shot, start to think of your bunker technique as a leadsided action – that’s left for right-handers. Begin at address; play the ball well forward in your stance, opposite your lead toe cap. Go up on your trail toe to allow your lead leg to take your weight and establish a balance point over your lead foot.
Be The Back Foot
In most bunker shots, we’re confronted with a lip and a need to get the ball to rise relatively quickly. The sand or lob wedge has more than enough loft to meet the task; however, being human we tend to try to assist it. Typically, that means staying back behind the ball and trying to scoop it up into the air. The club hits the surface way too far behind the ball and stalls in the heavy sand. The ball never has a chance of getting out.

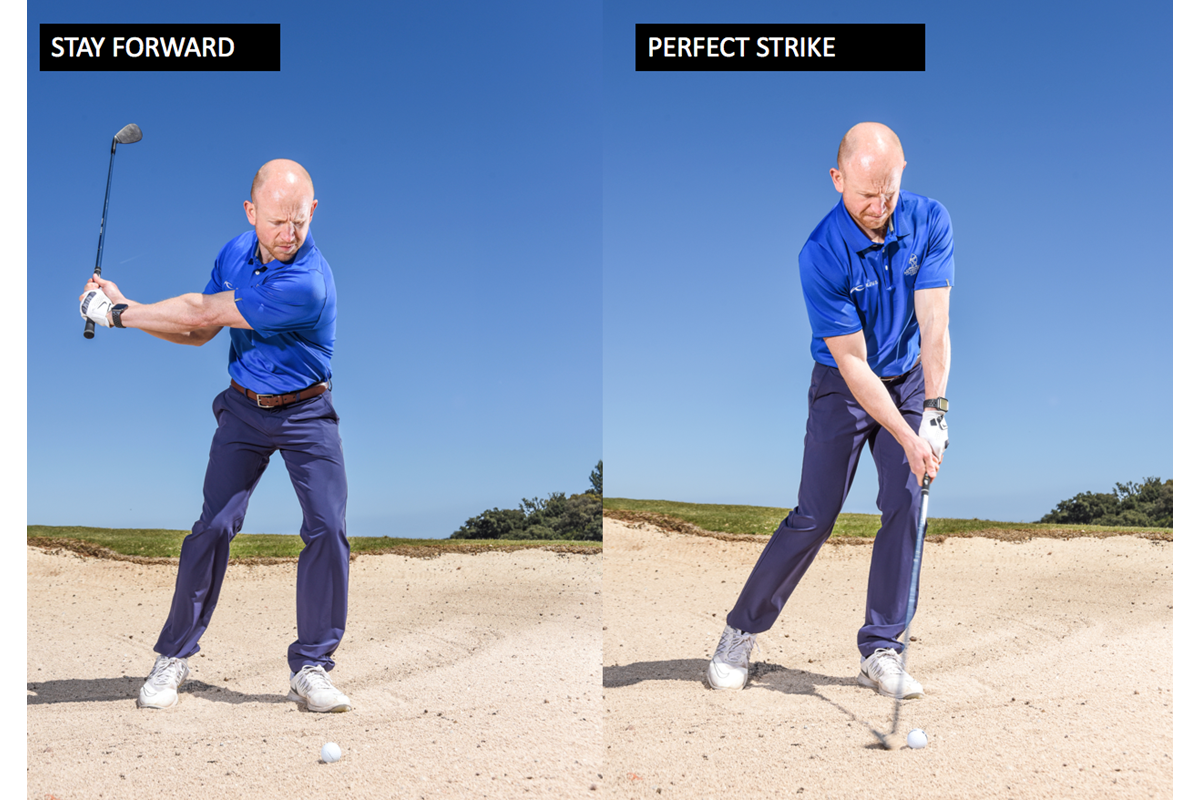
Stay Forward
As you swing back, balancing over your lead leg anchors your action. That means no swaying or lateral movement and keeps the low point of your swing in a constant position. This will help you control the club’s entry point into the sand. This lead-sided position may restrict your backswing a little, but that’s fine – a compact action helps a precise strike.
Perfect Strike
The lead-side feel remains in place all the way through to impact. Keeping up on your trail toe helps you avoid any tendency to fall back. Your aim is to strike the sand an inch or so behind the ball, and with a little practice, this drill will help you achieve that regularly.
Shallow attack: Staying on your left or lead side might feel to you like you’re going to chop down into the sand. But this forward ball position deals with that, promoting impact later in the swing after the club has bottomed out. This means an effective, shallow strike that allows the sole bounce and the club’s loft to get to work

Three Putting Through Poor Distance Control
Problems with approach putting centre around distance control; you can be 8ft out for length much more easily than for line! Most distance control issues stem from inconsistent striking; different strike points on the face transfer varying amounts of energy to the ball, making it impossible to judge how much force to apply; make your strike more consistent and your distance control will follow.
THE DATA SAYS…
“Three-putts generally happen due to a poor first putt, leaving the golfer with a longer second putt which is difficult to make. The average distance of a second putt when a three-putt occurs, by handicap is:
• 8 handicap 5.8ft Per cent make at this distance: 38%
• 14 handicap 7.6ft Per cent make at this distance 29%
• 20 handicap 9.2ft Per cent make at this distance 9%

“Our data also shows that 84 per cent of all putts outside five feet finish short. This suggests both the first putt has been left short and/or the second putt is also left short, as the overall average of second putts in a three-putt is over five feet. This confirms the importance of improving strike quality in avoiding three-putts.
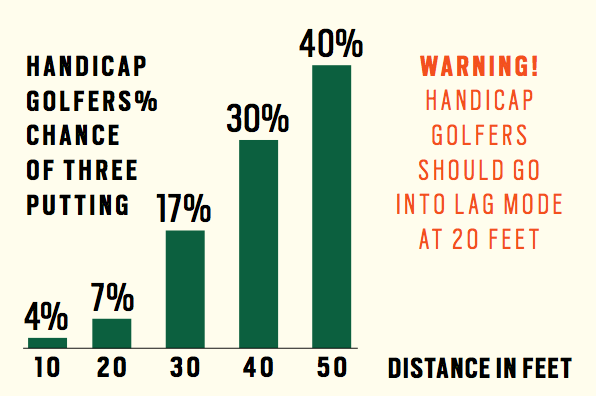
Shot Scope say they also have data to derive a three-putt likelihood percentage, which works out at:
• Eight handicap: 10.2 per cent
• 14 handicap: 13.8 per cent
• 20 handicap: 19.1 per cent.
“This ultimately means a three-putt costs an eight-handicapper an average 1.9 shots per round, a 14-handicapper 2.5 shots per round and a 20-handicapper 3.4 shots per round. “At least a couple of shots can be saved by hitting a better first putt.”
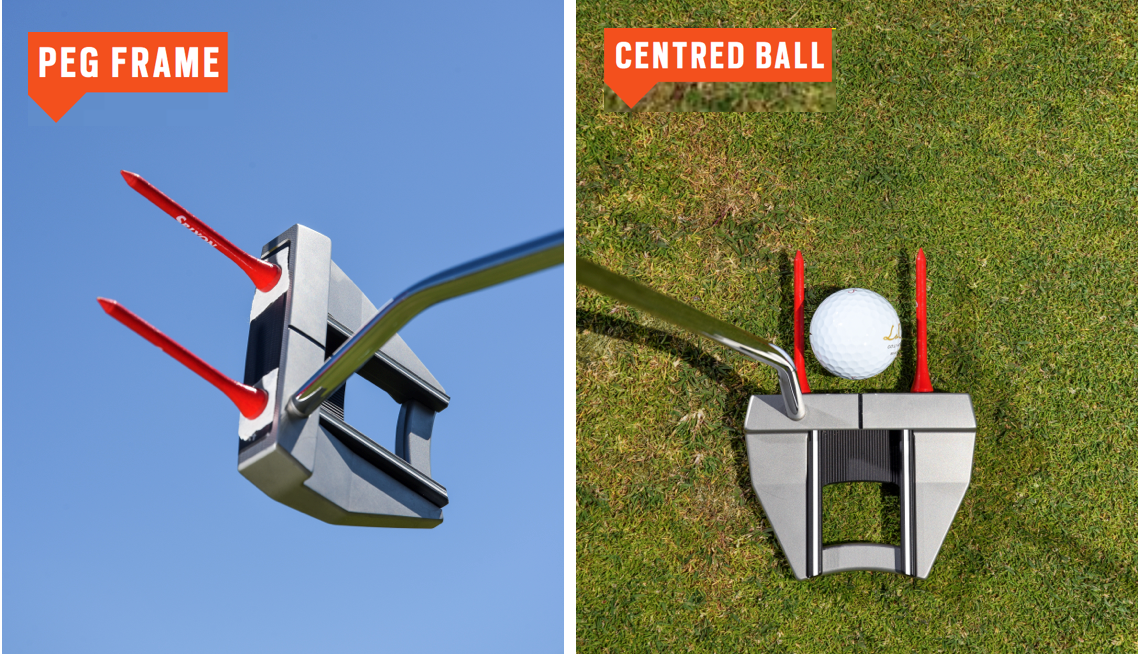
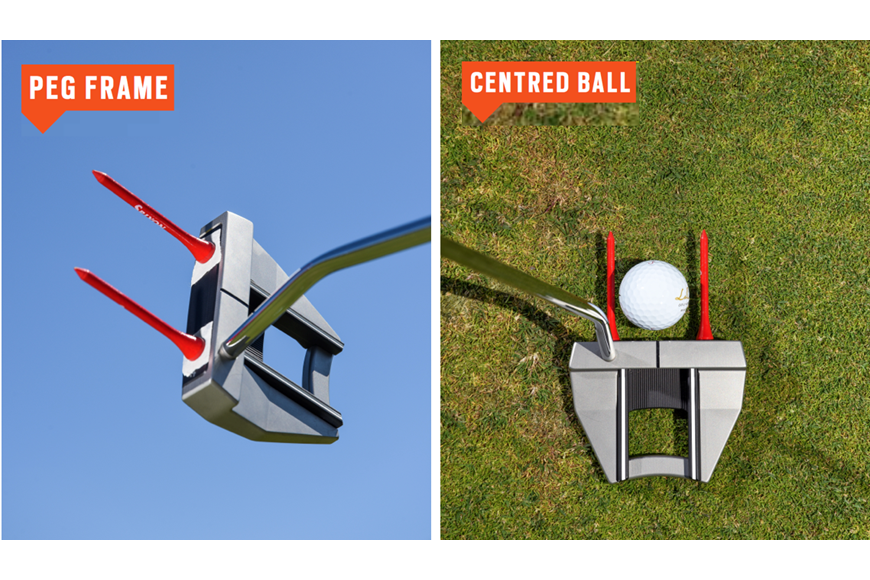
Peg Frame: To do this, get some double-sided tape or Blu Tack and put some on the toe and heel of your putter. Now stick two tees to them as shown, just wider than a golf ball.
Centred Ball: Set up to a ball. Check that when the ball is opposite the putter’s sweetspot, it sits nicely in the centre of the two pegs. If it does not, adjust the peg positions.
Sweet Zone: With the pegs in position, simply hit putts. The pegs help you place your attention on the face and the strike point. Don’t think technically – just try to strike the ball without any contact with the tee pegs. The better you get at this, the more consistently central your striking will be… and the better your distance control.

Three Putting Through Missing Short Putts
With just five per cent of the ball’s starting line down to path, missed short putts are about poor face aim control and an inability to hit your starting line. Here is a drill to help
THE DATA SAYS…
“As you might expect, a missed short putt costs the golfer an extra shot on that hole. It also may not surprise you to learn that missed short putts are the most expensive mistake you can make.
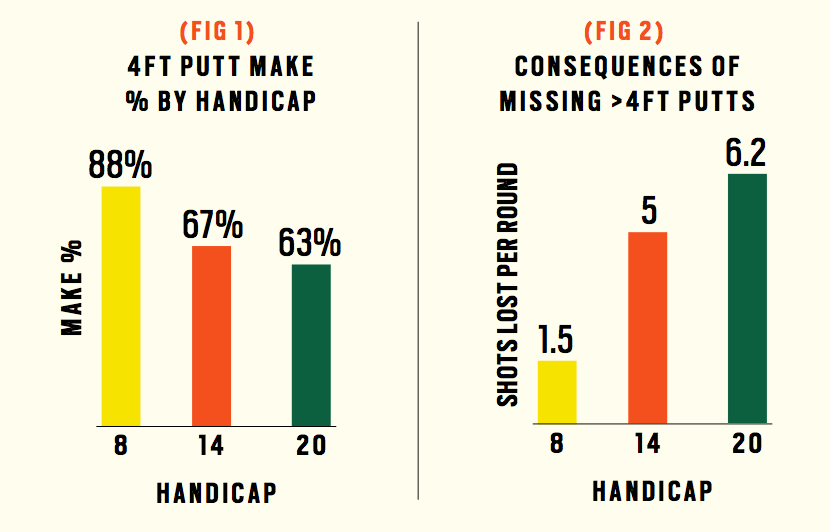
“They cost the eighthandicapper 1.5 shots per round, the 14-handicapper a massive five shots per round and the 20-handicapper 6.2 shots per round. According to Shot Scope data (Fig 1), the make percentage on putts of four-feet and under is:
• Eight handicap 88%
• 14 handicap 67%
• 20 handicap 63%

“This basically means that if the typical 14-handicapper faces three putts of these lengths, they will miss one of them – a clear opportunity for fast improvement.
“When a golfer misses a four-foot-and-under putt, their average score versus par for that hole is:
• Eight handicap = +1 (bogey)
• 14 handicap = +1.5 (bogey/ double bogey)
• 20 handicap = over +2 (double bogey or worse).”
Arrow Straight
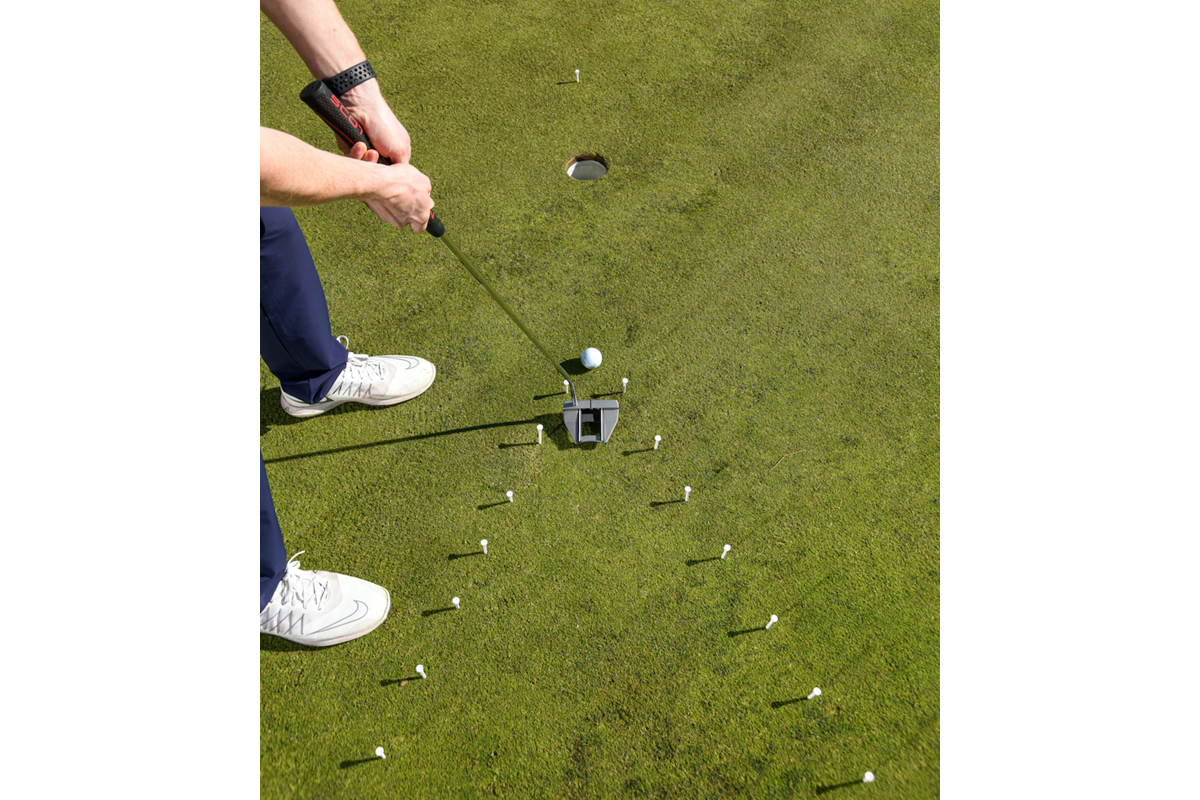
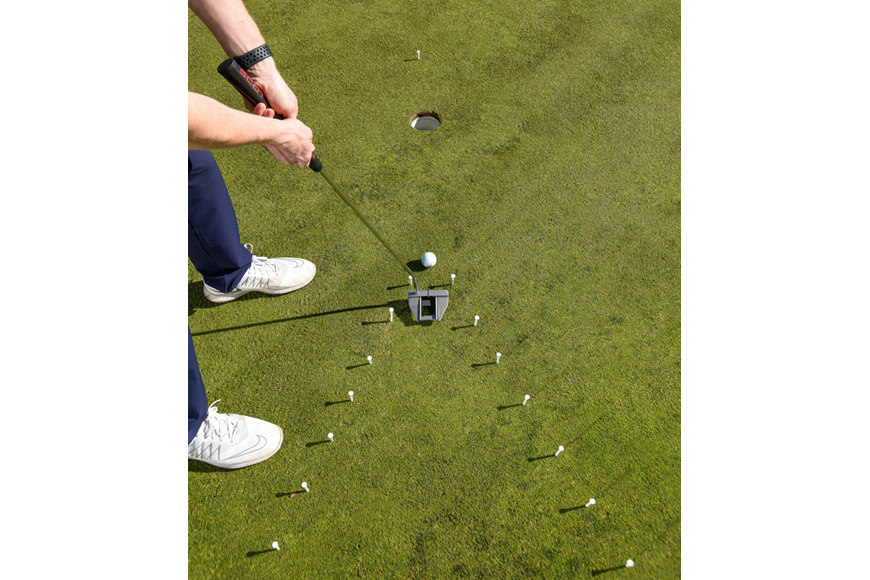
Use tee pegs to set up a chevron as shown. The narrowest pair of tees should be three inches apart and two feet from the hole. Allow each pair to widen, with around seven tee pairs in total. Place a ball in the middle of the second-narrowest pair of tees. Try to strike it between the narrowest pair and into the cup. If you achieve it, move back to the next pair.

Magnificent 7
Keep going like this, putting from between each pair of tees as you move back up the tunnel. As soon as the ball strikes the tees in front of you, begin again from your start position. You’ve completed the task only when you hole out from between each of the seven pairs of tees.