5 Ways to get golf fit
Published:
Whether you want to improve your mobility, your balance, flexibility or your posture, here are five ways to get golf fit this Spring.
When things go wrong with our game, our first instinct is to question our technique. Of course that might be where the problem lies; but more often than you might think, a simple focus on improving your physical conditioning can resolve or at least improve the situation.
In this feature we cover
● Beat your ‘Over the top swing’
● Build backswing power, poise and posture (jump to)
● Improve shoulder mobility to stop your slice (jump to)
● Improve your pelvic rotation (jump to)
● 5 Minute warm-up drill (jump to)
#1: Beat your ‘Over the top swing’
We are learning how improved physical conditioning can improve your technique. This month we turn to the bane of club golfers everywhere… ‘over the top’.
This classic out-and-over move from the top of the backswing, which sees the club attack the ball from out-to-in, typically matches with an open face to produce that hated slice. But simply by working on your mobility, you can forge a more effective move. Here’s how.
Where does over-the top come from?
Over-the-top is usually the result of overuse or over-dominance of the upper body during the downswing. When your upper half dominates your more passive lower body, the club is typically thrown outside the intended swing plane and the club is forced to attack the ball from out-to-in.
Physical limitations
Over-the-top can be linked to a golfer’s inability to work their lower half independently from the upper half – something that’s often called ‘separation’. To beat ‘over-the-top’ you need to wake up and mobilise your body from the waist down. Here are two drills that will help you.
— Drill 1: Ball Throw —
Get your lower half more active at the change of direction… and build the feeling of separation:
#1: Swing back and hold
For this drill you need some kind of ball – a football is ideal. Hold the ball with your palms facing each other, and take your regular stance. Now swing slowly back until your lead arm is parallel to the ground and hold the position.
#2: Split Second
From here feel your arms and the ball hold their position, just for a second or so, while you let your lower body lead the change of direction. Allow weight to shift back into your lead foot, and your hips to begin their rotation.
#3: Happy Release
After holding that position for a second, let it go and continue with your hip rotation. But as you do, throw the ball straight down into the ground; it should bounce behind the outside of your trail foot. That intention helps prevent your shoulders simply opening out with the hips, and preserves your feeling of upper/lower-half separation

Better Path, More Power: Keep working on this drill and you will start to develop a feeling for your hips and lower body leading the downswing, and your arms and shoulders following. This will help train a better path for the downswing, as well as a more powerful movement sequence.
— Drill 2: Step Change —
A full-speed drill that adds dynamism to your ability to separate upper and lower body:
#1: Head Start
Take your 6-iron, and a regular stance. But just before you swing the club away, bring your lead foot across and next to your trail foot. The ball should now be just outside your lead foot. Swing the club forward, over and past the ball; you will begin your swing from here.
#2: Trial Separation
Swoop the club back, over the ball. But as soon as it passes your legs and begins to gain momentum, begin to step forward with your lead foot. Plant it in its regular position. You are creating a situation where the club is going back while your lower body is moving forward… which will help you feel and train separation.
#3: Power Stretch
Continue with that feeling of the lower body moving towards the target and the upper body swinging away from it. Done at speed, you will begin to create a powerfully stretched feeling at the top with your lower body – weight shifting and hips rotating – already leading the downswing.

New Order: This drill works by helping you feel the all-important sequencing that allows your body segments to work in the right order on the way down. Work on this feeling of the lower body leading your upper half and you will find yourself able to deliver the club from a neutral or even inside attack path… and leave over-the-top behind for good.
#2: Build backswing power, poise and posture with this simple exercise
At a fundamental level, the golf backswing asks us to swing our arms up into the air without changing the tilt of our upper body. That might sound simple, but it does place demands on the muscle groups that help our arms stretch upwards.
Here we are, looking at the latissimus dorsi (or lats) – the large muscles that span the entire back and insert onto each arm. If your lats are tight, you risk restrictions in that upward motion that can severely compromise your technique. Here’s how to check their flexibility… and what you can do to improve it.
1: Back Against The Wall
Form a half-sitting position against a wall. Your feet should be shoulder width apart with heels under knees. Place a shaft behind your lower back and make sure you apply enough pressure to keep it pinned into the wall. Stretch your arms in front of you, elbows locked and thumbs up.
2: Raise Your Arms
Now lift both arms up, as high as they will go. We need to see how close you can get your thumbs to the wall without your arms bending, your back arching (keep that club in place!) or creating pain. Note your range of movement might be different for each shoulder. When you reach your limit, you will fall into one of four camps:
● Below 120 degrees: Top of the arm below the nose
● Equal to 120 degrees: Top of the arm covers the nose
● Between 121-169 degrees: Top of the arm between nose and the wall
● Greater than 169 degrees: Touches the wall

#3: Your slices might be the result of shoulder mobility. Try this test to help improve it
Fault: ‘Flying’ trail elbow, steep attack, loss of posture
Fix: Improve shoulder mobility
Today, we understand better than ever just how profoundly our golf swings are affected by our physiology. Contributing to this body of knowledge is the Titleist Performance Institute, which has been gathering data on ef cient swing movement since 2003.
As a TPI-certified instructor I regularly use the TPI’s 16 standard physical screening tests to assess a golfer’s ability to move through the range of movement demanded by the golf swing. In this series we’ll look at six of them. Try each test… and if you fail, there’s a drill to help you improve. Your body – and your scores – will thank you for it.
1. Set your trail arm: Stand upright, your arms by your sides. Raise your trail elbow to shoulder height, opposite the shoulder joint, and set your forearm horizontal, the palm facing down.
2. Rotate the forearm up: Now rotate your forearm upwards through its full range of movement, pivoting around the elbow. Your goal is to get your forearm at or past your spine angle – in other words, vertical.
3. Repeat in posture: Take your golfing posture and repeat the test below. Feel your shoulder joint stretching backwards as you approach your full range of motion. If you can get your forearm at or past your spine angle, you’ve passed!

As you complete your swing, your trail shoulder is increasingly asked to rotate backwards. Golfers with any kind of shoulder restriction won’t be able to do this; instead, they will tend to straighten up to complete the backswing, creating loss of posture and inconsistency.
1. Flex Appeal: The flexible Tour pro gets to the top with the trail elbow pretty much under the handle – a position that supports the club and keeps the arms and body connected.
2. Improve shoulder mobility: Grip the club in your trail arm only. Cup the back of your lead hand around the tricep of the trail arm. Now swing to the top. This stops the trail elbow splaying and helps stretch out the trail shoulder. Even if you passed the test, work on this drill from time to time to keep that trail shoulder mobile and stable.

#4: Spinning Class – Get a more effective rotation through the pelvis
When you’re not hitting the ball as you would like, improving your technique is always a good way to go. But so too is working on your physical conditioning for golf, and so-called “spinning out” is a great example. We often hear about the importance of rotating the hips/clearing the lead hip on the way down, but if you don’t have the core strength or mobility to control this motion, it can end up causing you problems. Here, I explain why… and show you two ways you can train a more effective rotation through the pelvis.
What is ‘spinning out’?
This phrase is used to describe downswing hip rotation that gets overcooked. Yes, we need the lead hip to rotate and clear on the way down; but if this is taken to excess, the upper body, arms and club simply get left behind.
Power… through deceleration
When we look at the world’s best players in 3D we see an interesting pattern; though the hips start the downswing, their initial acceleration is followed by a distinct and significant deceleration. Indeed, it’s this slowing down that allows the upper half to create its own rotational speed. Watch discus throwers to see how an abrupt lower-body halt fires speed into the upper half.
Fore… right!
When this happens, we get a disconnect between the upper and lower body. When the shoulders, arms and club can’t catch up with the lower half there is no effective release of the club. The clubface typically comes in very late and very open, and the right-hander will flare shots to the right.
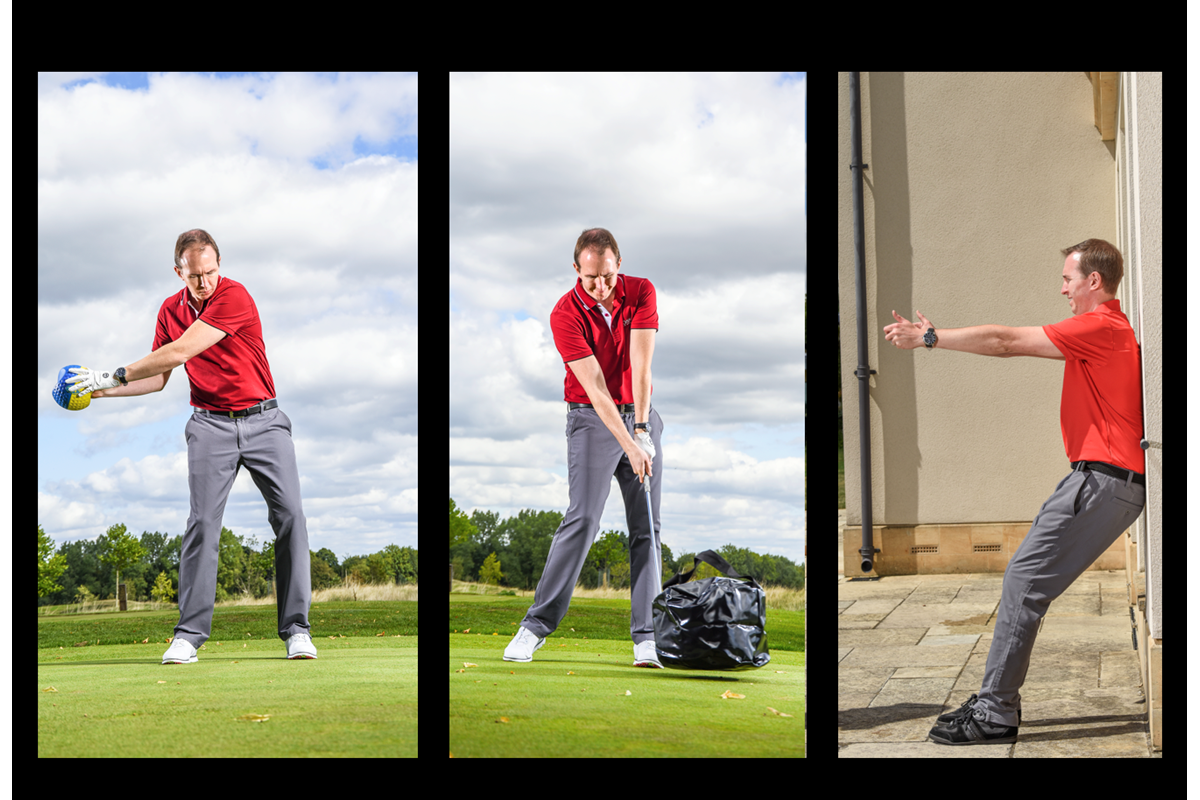
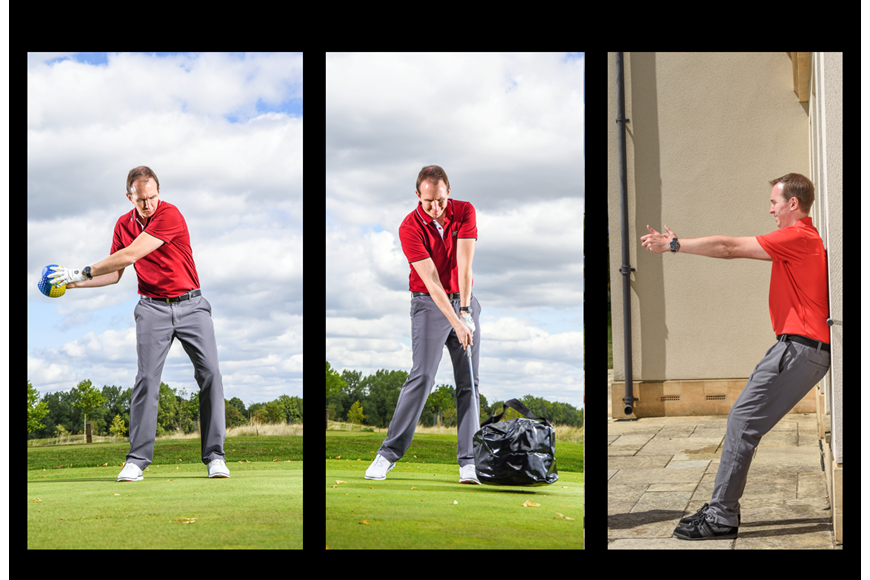
— Drill 1: Impat Bag —
In a powerful and coordinated impact position, the core muscles of your stomach are working hard to control ground forces and assist the correct deceleration of the hips. When you spin out, your core is asleep. An impact bag or similar can wake it up. Set up to the bag, make your regular backswing and give it an aggressive ‘pop’.
Total recoil:
As soon as possible after impact, use the muscles of your core to return the club to the top of your backswing. This intention activates muscles that would otherwise be switched off. Repeat this drill until that recoil starts to feel more natural. Then remove the bag and make your regular swing; your core will feel more engaged, your impact more poised and powerful.
— Drill 2: Upper Body Punch Shots —
One of the best ways to slow your lower body down is to speed your upper half up. This drill helps you feel that. Take your normal, neutral posture, but widen your stance a little. Focus on a point just below your navel and engage your core muscles to reinforce that focus. This will give you a stable, grounded feeling.
Off your chest
Now hit some punch-type shots from that address position. Allow your upper body to drive the force of this swing. Feel your chest and arms speed up through impact, while that core activation keeps your lower half stable. Hit crisply, but keep your throughswing short. This will help you feel how speeding up the upper body helps the lower body slow down.
#5: Go to the course prepared by using this five minute dynamic warm-up
So you’ve been sitting down all day, starting at a computer screen, waiting for the moment you can leave and play some golf. It finally arrives, so you sit in a car for 20 minutes getting to the course.
Sure enough, on the 1st tee you’ve as creased and rigid as a piece of corrugated iron and it takes you six holes to find any sort of rhythm and form. What you needed was a quick fire, dynamic warm-up that gets your golf muscles primed for speed and action and quashes any chance of strain or injury. And here it is… nine 30-second exercises guaranteed to take you from board to bendy in just five minutes.
— Exercise #1: Two Clubs (30s) —
Start by taking two mid irons out of your bag. Place the handles together, faces of both square to your target, and grip them in your palms as shown. Make slow, full swings, allowing the extra weight to stretch out the key golfing muscles of your shoulders, chest and back.
Finish it off:
Those muscles need to work throughout your motion, so it’s just as important to stretch out the through-swing. Make sure you complete your two-club swing. Sweep right through to a finish, chest facing left of the target, belt right at it and trail foot up on its toe.
Why you need to do this:
This is simply to add a little bit of weight to get the blood pumping in preparation for the rest of the routine. The start should be slow before building up a bit of speed.

— Exercise #2: Club in each hand (30s) —
Now separate the clubs and grip one in each hand. Make the same slow, full swing, trying to keep the shafts parallel throughout.
Why you need to do this:
This helps make sure your lead and trail arms are awake and making a coordinated and balanced contribution to your motion.
— Exercise #3: Leg swings forward and back (30s) —
Place your driver in front of you and lean on the handle. Spend 15 seconds swinging the left leg forwards and back, then 15 seconds with the right.
Why you need to do this:
This stretches out your hamstrings, quads and glutes. It improves mobility, helping you maintain posture, while promoting rotation without sliding.

— Exercise #4: Leg swings side to side (30s) —
Still leaning on your driver, take each leg in turn and swing it out to your side then back, across you, for 15seconds.
Why you need to do this:
This works your hip adductor and abductor muscles, which play key roles in stabilising your pelvis as your hips rotate and extend.
— Exercise #5: Clap in front and behind (30s) —
Bring your hands together in a clap in front of your belt buckle, then swing them up in a wide circle, over your head, to clap again behind you.
Why you need to do this:
The forward clap mobilises the large trapezius muscle between your shoulder blades, which supports your arms and aids stability. The backward clap opens up your chest, helping shoulder rotation.

— Exercise #6: Back slaps (30s) —
Take your golf posture and spread your arms out either side of you. Now fold them around yourself to slap your back on both sides. Repeat for 30 seconds.
Why you need to do this:
Back slaps work your chest pectorals and middle and lower trapezius (neck) and deltoid muscles, improving joint mobility allowing for a full shoulder turn
— Exercise #7: Pistol swings (30s) —
Spread your arms, fold your elbows in close to your sides and point your forefingers out. Turn back and through, keeping arms and body locked into position.
Why you need to do this:
This stretches out your shoulder rotator cuff muscles and encourages your core to drive backswing and through swing rotation.

— Exercise #8: Helicopters(30s) —
Grip your driver by the middle of the shaft and use fore arm rotation to twist it one way and the other. Do 15 seconds for each fore arm.
Why you need to do this:
This exercise loosens up the potentially tight tendons and muscles in your hands, wrists and forearms, promoting full wrist hinge, cock and release.
— Exercise #9: Swing shoulders (30s) —
Take a wedge and simply swing it in a huge circle, keeping your arm stretch. Swap to the other arm half way through, before finishing with some fast swings to prepare body and mind for speed.
Why you need to do this:
This drill works your shoulder deltoid and shoulder trapezius areas, freeing up range of motion and promoting free arm motion from a stablecore.