How to score better on par 3s
Published: Last updated:


Discover the preparation, strategy and skills that will take your par 3 performance to the next level
Check the stroke indexes on the scorecard of your home course and you’ll likely find the par 3 holes are ranked among the easiest. It seems logical; after all, the shorter the hole, the fewer opportunities it gives us to mess it up.
RELATED: Me And My Golf’s best-ever tips
Cold hard stats, however, suggest otherwise. According to golf data collection experts Arccos, the average par 3 score for golfers between a 13-20 handicap is 4.01. That’s right, the typical club player drops a shot every time they play a short hole. Even elite amateurs between 0-5 handicaps drop half a shot per hole on average, so with four per course, that’s two shots a round.
Perhaps one of the reasons for these ignoble truths are the range of skills needed to make your par. Generally boasting the best-protected greens on the course, shorties demand a special blend of precision and touch. Your skills with irons, chipping clubs, the sand wedge and the putter are all put to the test. In addressing all four areas of the game, this article will equip you with the tools needed to get on top of the short hole… and bring that average score down.

Fail to prepare, prepare to fail
Before we get into the technique, let’s talk about two things you should do on the tee of every par 3 you face – picking a strategy for playing the hole, and observing a disciplined pre-shot routine.
1. Strategy: pick your battles
Not all par 3s are reachable in one shot for every golfer. Even if it is reachable, going for the green is not always the best option – take for example a 220-yard par 3 which may be within range but demands a 200-yard carry over water. The first thing you have to ask yourself is, then, whether you are going for the green.
No, I’m not going for the green
If you are taking the green off the table, look hard for the bail-out. In almost every circumstance the architect will offer one, designing a safe zone that leaves a sensible chance for a chip and a putt. Once you’ve identified this area, commit to it and select your targets with as much precision as if you were going for the green.
Yes, I am going for the green
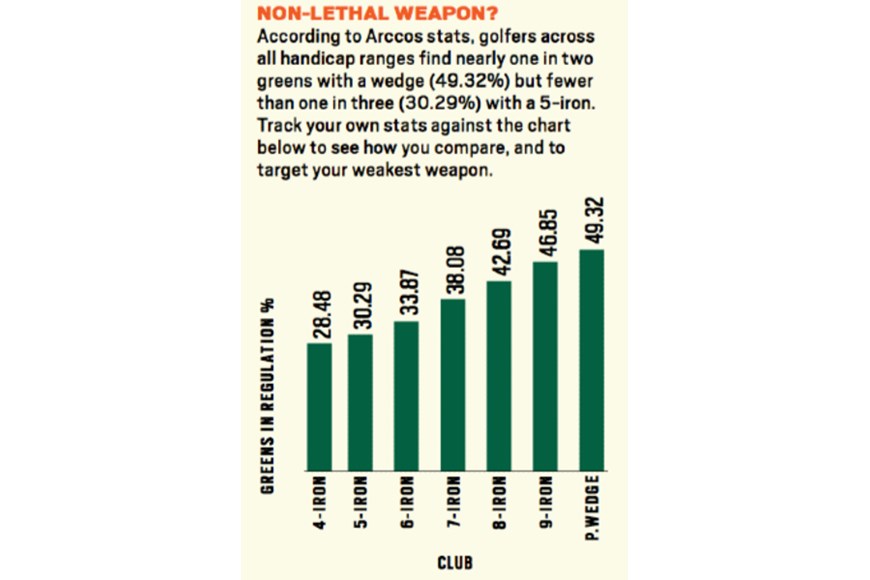
Once you’ve established you’re going for the green, turn your attention to clubbing. Arccos figures show golfers between 11-20 handicaps miss 38% of greens short, and just 5% long. So ask yourself what club you would need to airmail the green. This then becomes a club that can find the target, even with a slight miscue.

2. Pre-shot routine: get square every time
To hit great iron shots, we need to match up the clubface and swing path at impact. Golfers who do this get a raft of benefits including:
– Less shape on the ball
– Truer clubface loft applied, meaning better control of distance
– A purer landing angle, with spin under control
To give yourself the best chance of matching face and path you need to be aiming well – and here, a steady pre-shot routine is invaluable. Follow these four steps on all par-3 tee shots.
1. Pick a near target

Stand behind the ball-target line. Look for something on that line – old divot, forward tee marker, mower stripe – just a few feet in front of the ball. Use this as your reference for setting up square.
2. Set the club

Now place the club in its ideal position. This means aiming the blade flush at your near target, and leaning the handle slightly forward as the clubmaker designed. Correct lie angles for you should see the toe raised slightly.
3. Blend in the body

Now arrange your body aim around the club. Set feet, knees, hips and shoulders parallel to the ball-target line. Use the club to cross-reference with near and far targets and confirm a sensation of squareness.
4. Connect with the target

Your awareness of target is vital in giving your brain and body a clear picture to react to. So make sure your last act is to reconnect with your target. It must be clear in your mind’s eye as you start the swing.
How to compress your irons to hit more greens
The data clearly shows how the most common misses on par 3s are short. While a lot of this is down to clubbing errors, golfers also come up short because of poor-quality striking. With lofted-face irons, powerful striking comes from the ability to apply a squeezing, slightly downward attack that compresses the ball. Here are two drills that will help you.
Drill #1 – Pelvic shift
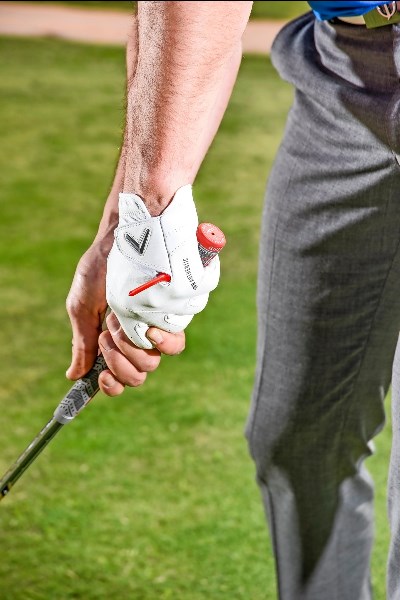
I’ve staged this position to illustrate the ideal impact position to create compression. As you can see, my hands are leading the clubhead. This creates the all-important forward shaft lean that allows the club to apply strong, downward pressure onto the ball.
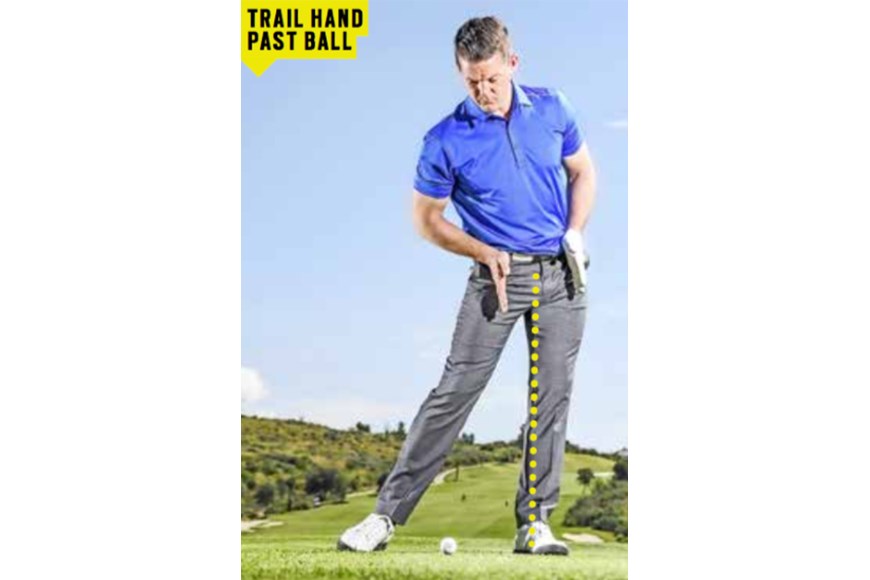
But note too that the part of my body furthest forward at this stage is my left or lead hip. It is this pelvic shift, laterally towards the target, that helps drive weight forward and promote that forward shaft lean. Getting this central zone forward is a key part of creating compression.
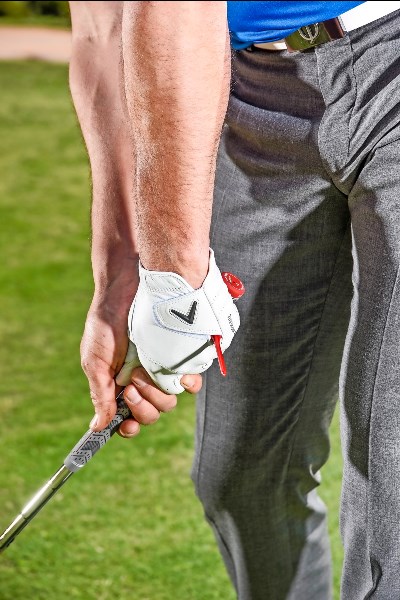
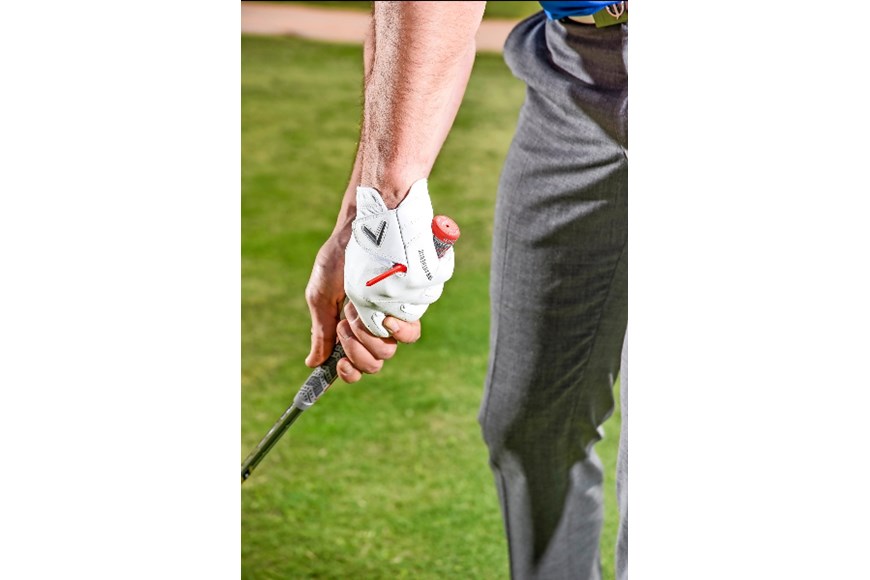
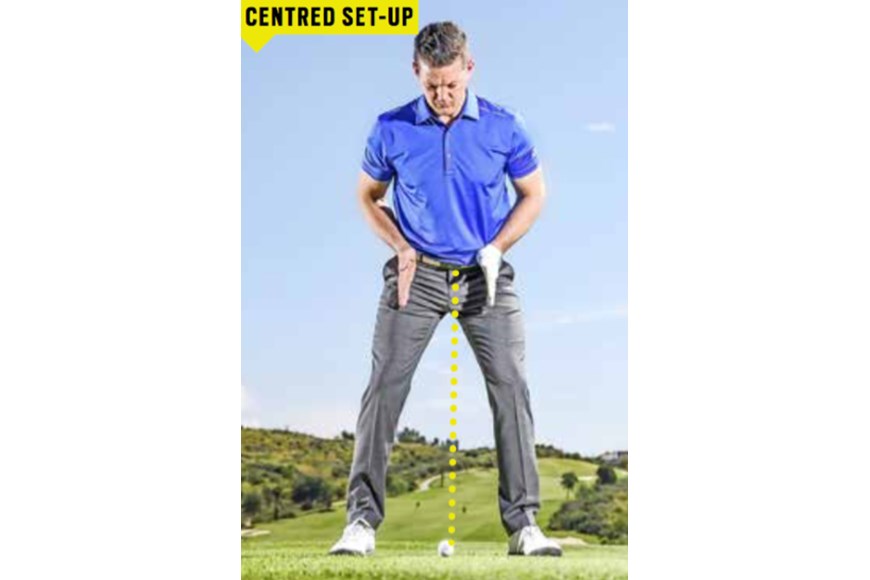
To train this motion, drop the club and take up your regular address position, the ball central in your stance. Check your belt buckle and shirt buttons are aligned opposite the ball. Place your palms as shown, against the front of each hip, to help throw your attention on to your pelvis.

Now, keeping your hands in place against your hips, smoothly push your hips and pelvis forward, towards the target. Keep going until your trail hand passes the ball. This will help you feel where your mid-section needs to be to compress the ball properly. Work on this forward motion before introducing it into your full swing.

Drill #2 – Flatter lead wrist
Work on that pelvic shift and you will start to find it easier to get your hands leading the clubface into impact. However, this can lead to complications with face aim. Here’s how to solve them.

We want the hands ahead of the clubhead at impact, but trying to achieve this can lead to difficulty squaring the blade. Often we leave the face wide open in an effort to keep the hands ahead. You can find a squarer blade by focusing on your lead wrist.

Find a long tee peg. Secure it against the back of your lead hand using the glove badge Velcro, as shown. Try swinging down to impact, holding the hands well ahead of the blade. You’ll see how this prompts the peg to point well right of target (right-handers).

Now work on getting that peg to point down, to the ground. To do that, you’ll have to rotate the forearm and flatten your lead wrist. Powerfully de-lofting the clubface and squaring the blade, this is the ideal position for the lead wrist coming into impact.

Now take your 7-iron. Stage impact, hands ahead of the ball, but work on recreating that wrist position with the back of the hand facing downward. Connect the wrist position to the blade’s aim to feel how to square the blade, even when your hands are ahead of it.
Chipping – build a solid, standard shot
If we do miss the green on a short hole, the most likely outcome is a chip shot. Despite what you may perceive, the vast majority of chips do not demand anything special – a simple back/through action that carries the ball to the green with enough momentum to run out to the pin almost always does the job. A simple shot demands a simple technique. Here’s how to streamline yours… and make it more reliable.
Don’t do this!

When I watch club golfers chip, I often see something like this – ball back, hands forward, plenty of shaft lean and a sharp, digging strike. Hitting down feels like it ensures ball-first contact, but it doesn’t quite work that way. The steep attack angle actually shortens the time the club is in an effective striking position, giving you a narrower window for success; it also sends the sharp leading edge towards the turf, promoting snagging. A shallower attack sets up a simpler action with more margin for error.
How to shallow your attack
To train this simpler, shallower chipping motion, take the longest iron in your bag – perhaps a 4 or 5-iron. Start simply by sitting the club behind the ball in its designed position, the handle only just forward of the head. Feel the sole of the club resting on the ground.

From here, adopt an address position that includes these four desirables:
1. Ball central in a narrow stance. This encourages an impact that’s less downward and more forward.
2. Hands down to the metal. This allows your arms to hang and helps you adopt the posture you would typically use for a shorter iron.
3. Weight just favouring front foot. This is almost just a perception, and certainly no more than 40-60%. This helps guard against that choppy attack.
4. Slight forward shaft lean. Aim to use the maker’s position. That puts your thumbs just forward of the ball while keeping the full width of the sole on the turf.

Backswing – natural wrist hinge only
Feel your chest and shoulders drive the backswing, your hands, arms and club swinging back in harmony. Your upper arms should stay close to your sides. The only wrist hinge should come naturally through the weight of the swinging clubhead. This promotes a good, wide arc.

Impact – forward thinking
For many golfers, the simple awareness they are chipping with such little loft will help them make the ideal, forward strike. But if you are still hitting down, aim to feel the clubhead’s sole ruffling the grass as it sweeps through.
This shallow attack gives two key benefits; it helps you apply true loft to the ball, making carry and run more predictable, and it allows the curved sole to engage the ground, limiting snagging and making the strike more secure.

Finish – stable clubhead
Keep your upper body engaged and rotating through the strike zone to the end of your action. This will help you keep your hands and arms quiet, with only minimal face rotation. Practise with the long iron before repeating the technique with your more regular chipping clubs.

Bunkers – think ‘long-heavy-long’
Par 3s typically have the most heavily-bunkered greens on the course. No doubt you’ve duffed the odd pitch shot in your time. In fact, this mishit is a great way to look at bunker technique. Sand shots demand a full swing which catches the sand a little before the ball – the perfect, simple duff escape!
Step #1 – Practise your strike
Before you step down into the sand, find some long grass beside the bunker. Rehearse a full, slow swing that gets down to the roots. Try to make the ru ed grass area as long as possible; it encourages a shallow base to the arc which helps you get the club through to a full finish.

Step #2 – Go square
Like chipping, simpler is better when it comes to bunkers. On anything but the shortest bunker shots, there is no need to mess with alignment and swing shape. Simply stand square and play the ball just inside your lead heel.

Step #3 – Splash it out
As you prepare to play the shot, channel that ‘duff’ stroke you practised in the long grass. Keep your eyes on the sand entry point, a couple of inches along the ball. Now just repeat that long, slow, flat-bottomed stroke, swinging along your toe line to the flag.
Sand is heavy, and will slow the club down. This is why making a long swing either side of the ball is so important; the full backswing gives you the ability to create the speed needed to get through the sand, while the full follow through ensures you deliver it. Make sure your hands reach shoulder height either side of the ball.

Putting – build stability to hole more par-savers
Whether through a missed green or ordinary chip shot, for so many club golfers achieving par on a short hole comes down to holing a putt in the 7-10ft range. With the hole just out of your peripheral vision, peeking to gauge your success becomes a major temptation. With upper-body motion liable to throw your stroke off line, stability becomes paramount. Use these keys to stay rock solid.
Ready, steady
Putting stability comes from a strong base. To feel how to set this, create what we could call a ‘mini-squat’. Allow your backside to move behind you so your flexing knees remain over your shoe laces. Place your hands on the front of your legs; you will feel those thigh muscles engaging, and becoming strong. With some practice you can quickly gain a sensation of being grounded and solid.

Go wide
You’ve learned how stability comes from engaging the leg muscles with a mini-squat. But for one final, easy balance tip, set your feet at least shoulder-width apart. Look for a feeling of being able to provide maximum resistance to anyone trying to push you off-balance.